
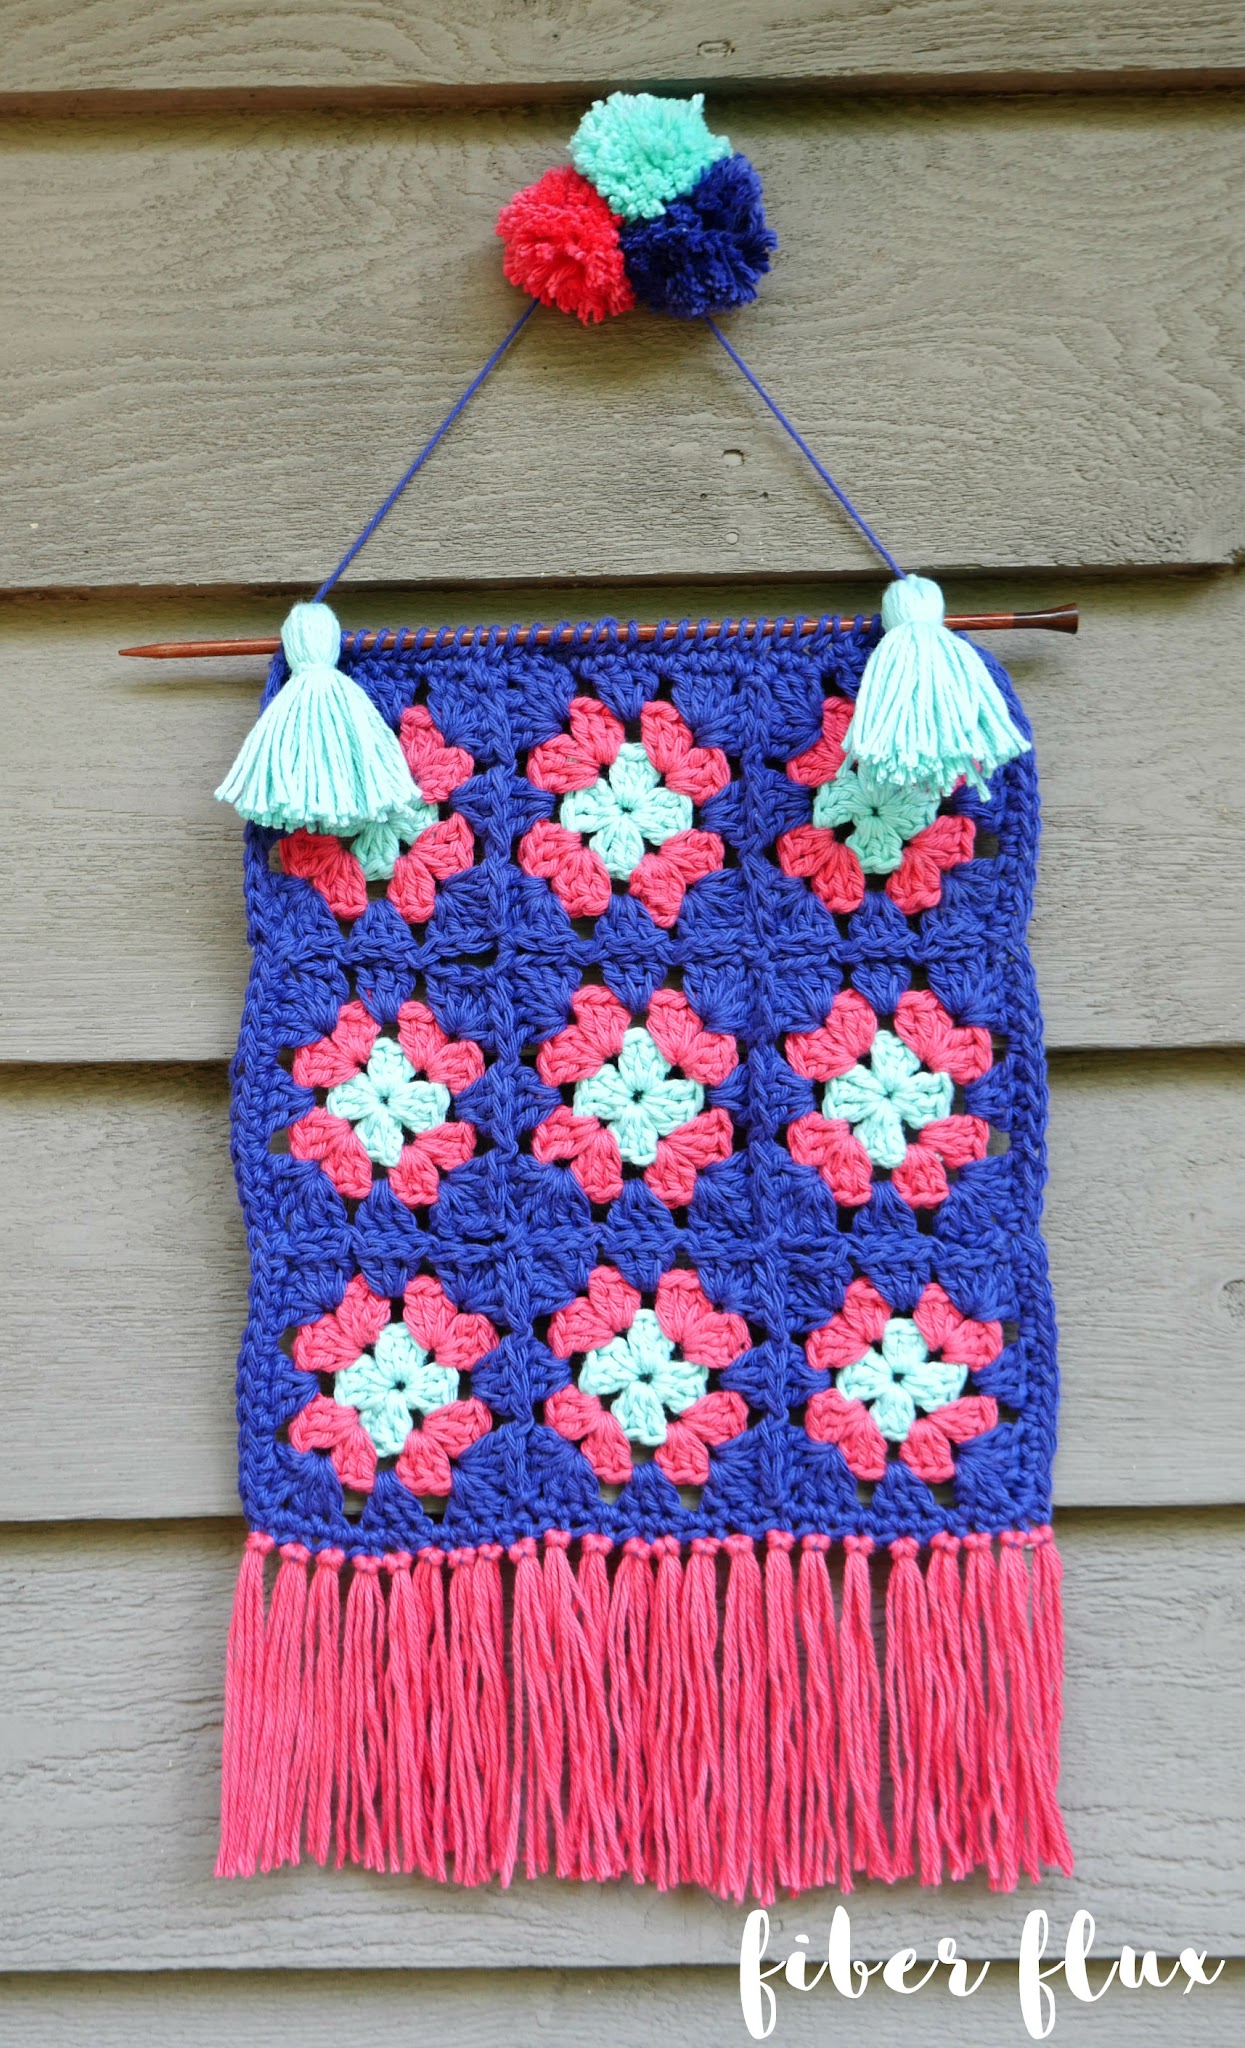
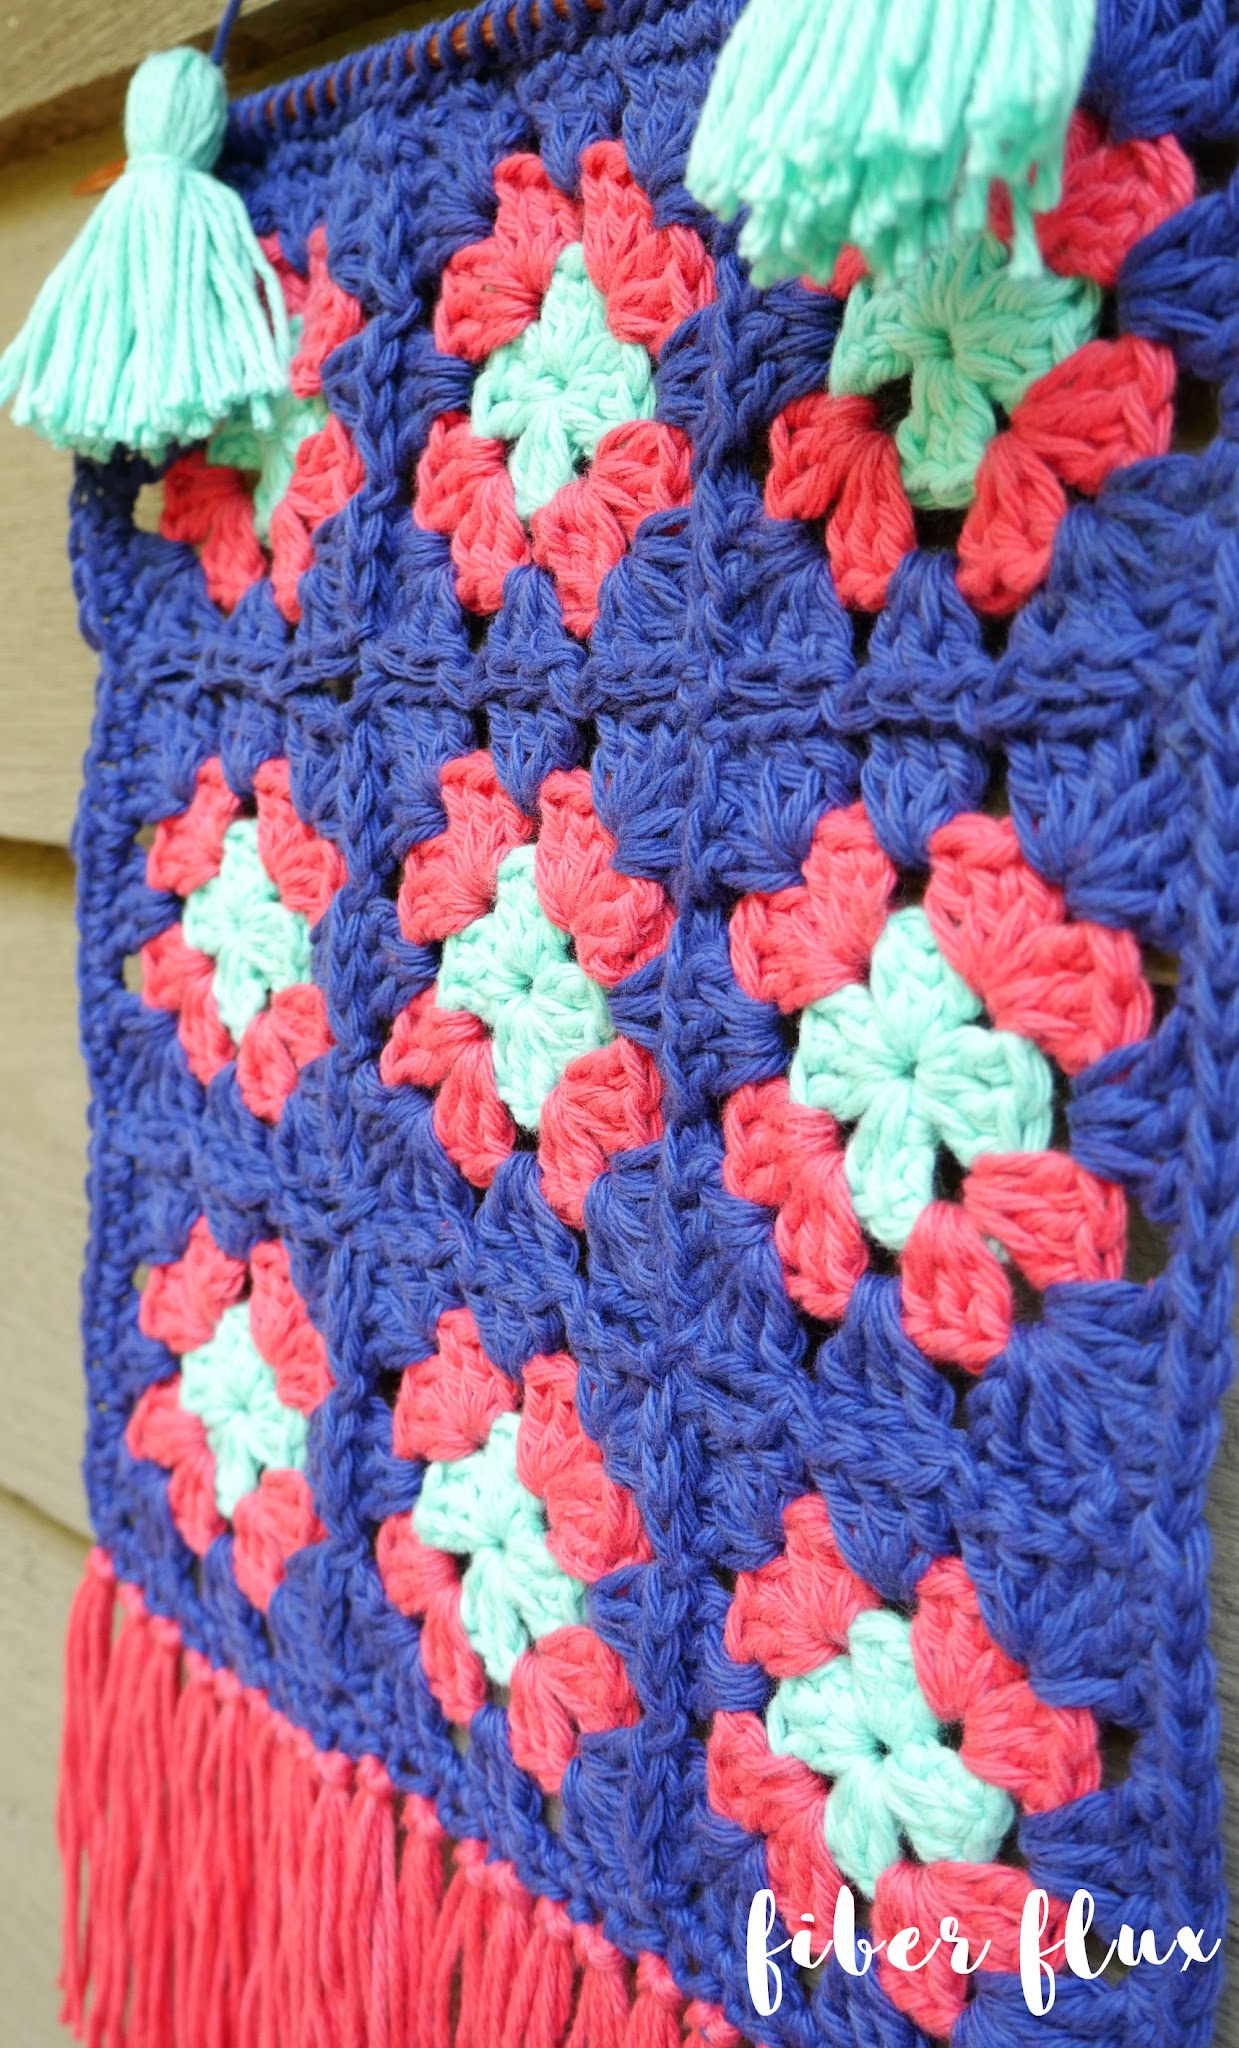
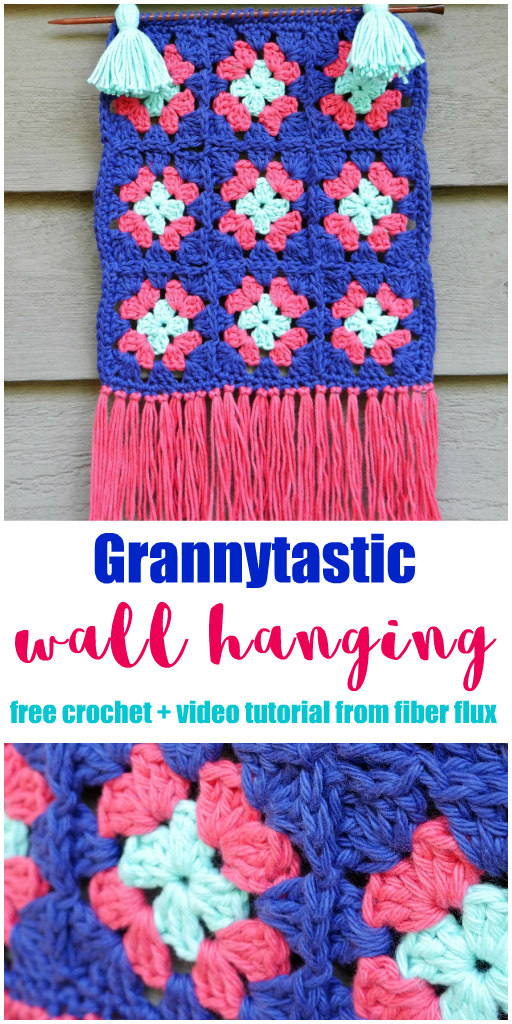
Celebrate your love of crochet with the Grannytastic Wall Hanging! Perfect to add a splash of color to a room or make a crafty space extra fabulous. Try three colors like I did or add more for a whole spectrum of color too!
Need a little help? There’s a full video tutorial below too!
Let’s connect!


Grannytastic Wall Hanging
By Jennifer Dickerson
Click the button below to add this project to your Ravelry queue:

Click below to watch a full video tutorial on how to make this project:
Love video tutorials? Click here to subscribe to the Fiber Flux YouTube channel for more stitchy fun!
Materials:
- 5.5 mm “I” crochet hook
- 3 balls of Red Heart Scrubby Smoothie (I used the “blueberry” “coral” and “aqua” colorways – 1 ball of each.
- A holder to hang your creation–you can use a dowel rod, a pretty branch, chopstick, or a stray knitting needle like I did!
- Tapestry Needle
- Scissors
Get yarn for this project here!

(Affiliate link)
Sizing:
- 11 inches tall and 11 wide (granny square part only)
- 21 inches tall (from pom poms down to bottom of fringe)
Abbreviations and Tutorial Links:
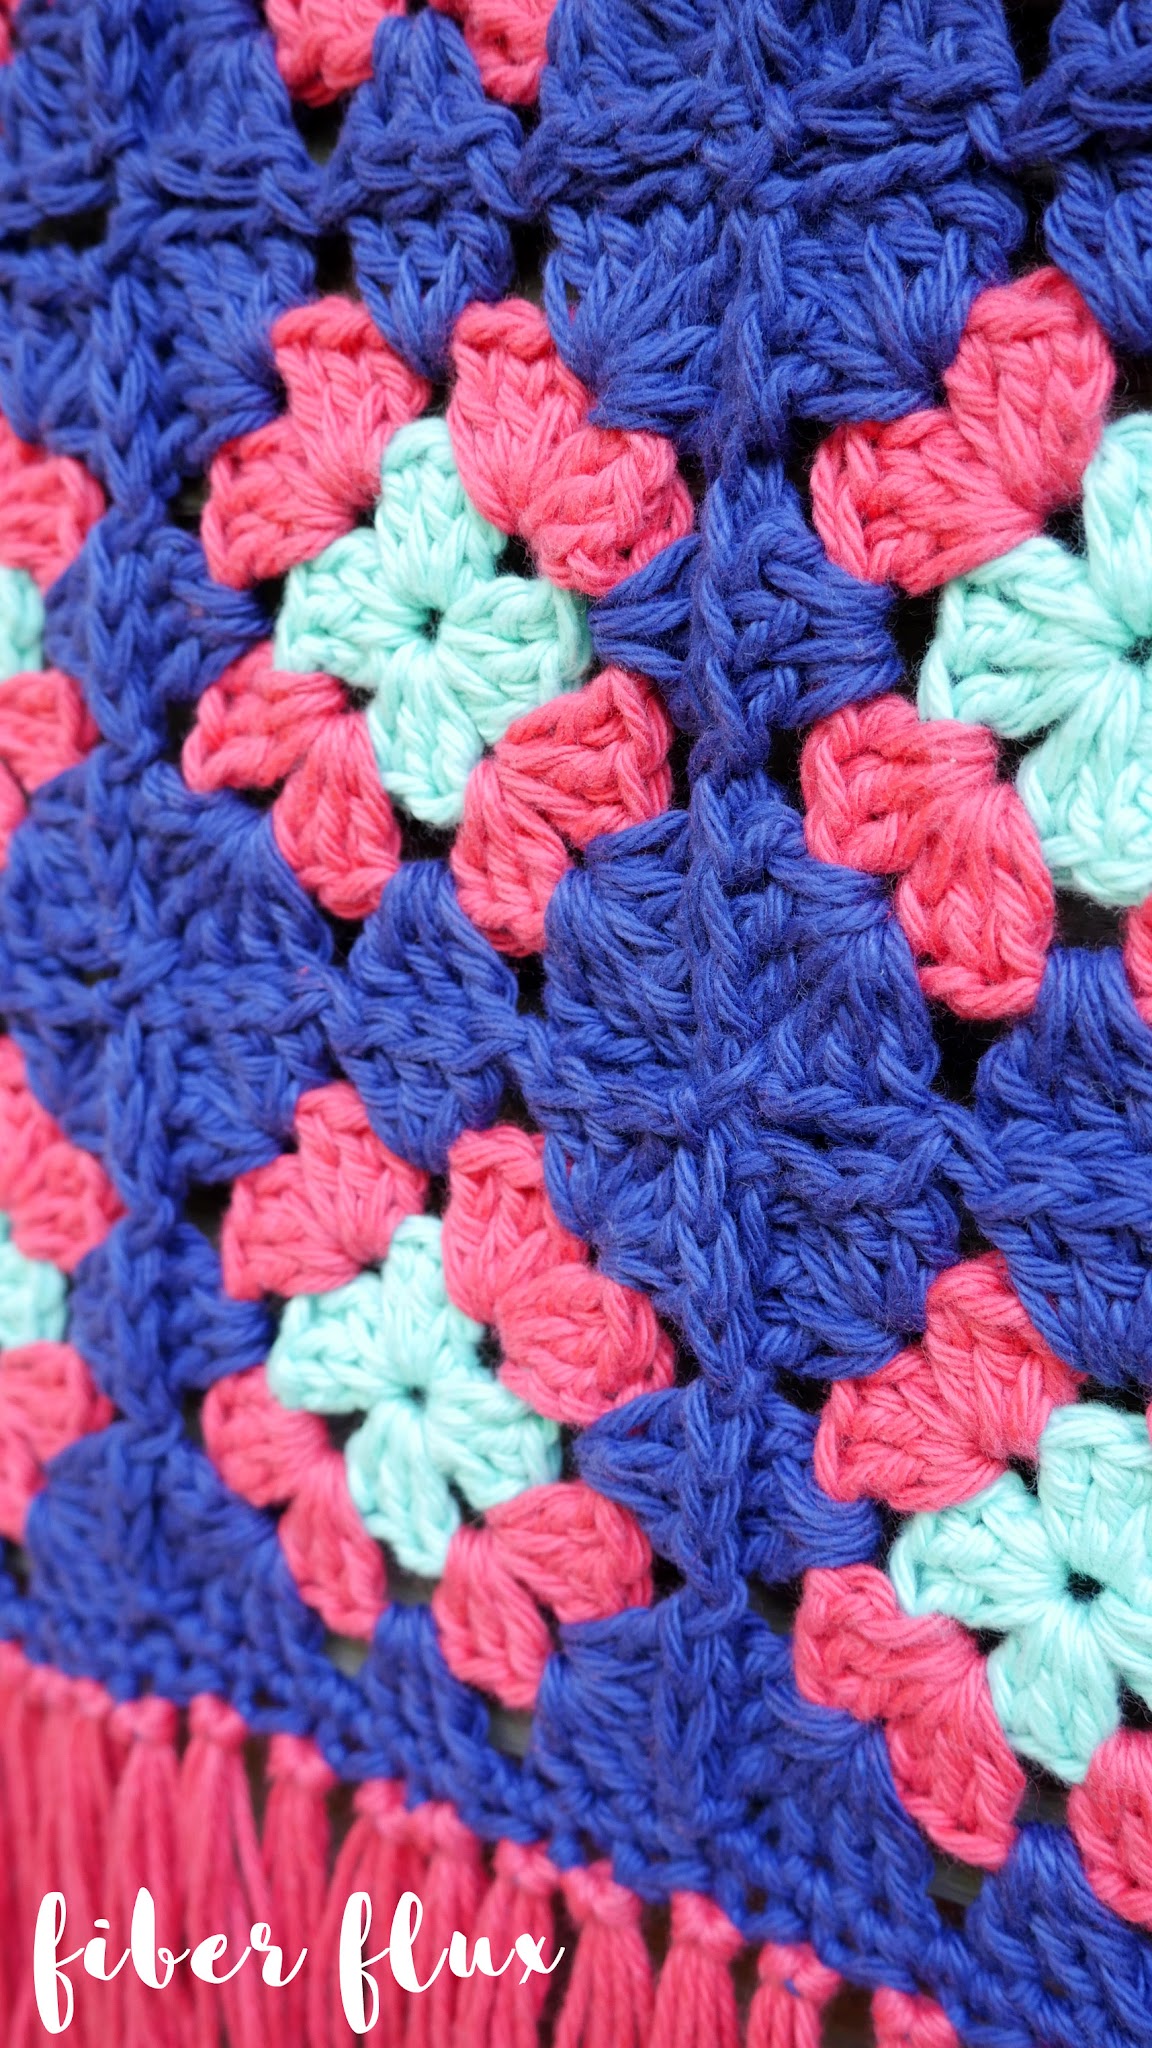
Granny Square Instructions:
Chain 4, join into a ring with a slip stitch.
Note: If you prefer to use the magic ring technique, please feel free to do this instead.
Round 1: Chain 4, work (3 dc into center of ring, chain 1) 3 times, then 2 dc into center of ring. Join to close with a slip stitch.
Round 2: To work the corner of round 2, first chain 3, then 2 dc in same space, then chain 1, then 3 dc in the same space…first corner done! Then chain 1, then work the next corner by working 3 dc in next space, chain 1, then 3 dc in same space, chain 1, repeat two more times to complete the round.
Round 3 (note-read the JAYGO part below before beginning round 3. The first square you’ll do rounds 1-3, and each square thereafter you work rounds 1 and 2, then work round 3 joining it to the other squares): Work the corner in the same manner as the previous round: chain 3, 2 dc in same space, chain 1, 3 dc in same space, chain 1. To work the sides, simply work 3 dc in the next space then chain 1…repeat until you reach a corner again.
Fasten off and weave in any ends that remain.
How To Join Squares Together (JAYGO/Join As You Go):
Note: It really helps to keep everything flat as you work, I like to lay mine on a table or lap as I go. Also be sure the right side (side that faced up as you stitched up your squares) is facing upward.
Part 1: The Very First Square (worked independently, nothing is joined to this one yet)
Tie on the round 3 color into any corner space of a square you’ve previously made and ch 3. In the same space, work (2 dc, ch 1, 3 dc). In each side space (there will be six of these if you are also working round 9 of the pattern. If you made a different number of rounds, your side space counts will be different) work (3 dc, ch 1). Repeat for each side space until you reach the next corner. In the corner space work (3 dc, ch 1, 3 dc). Continue around the square in this manner, working the side and corners the same way, then join with a slip stitch to close the round. Fasten off yarn.
Part 2: Joining The Second Square
Grab a second square and tie on the round 3 color into any corner space of a square you’ve previously made and ch 3. In the same space, work (2 dc, ch 1, 3 dc). In each side space work (3 dc, ch 1) You’ll have 6 side spaces if you made the same number of rounds as mine. Repeat for each side space until you reach the next corner…this is where we’ll make our first join. In the corner space work 3 dc. Instead of the ch 1, work a slip stitch into the other square’ corner space, then work 3 dc back into the square. As you continue down the side of the square, work a slip stitch into the other square instead of a ch 1, and 3 dc into the side spaces of the square. When you get to the next corner, work 3 dc, slip stitch into the other square’s corner space, then 3 dc into the corner to finish the joining. Work the rest of the square the way you normally would (3 dc, ch 1in each of the side spaces and 3 dc, ch 1, 3 dc in the corner). Join with a slip stitch to close round, fasten off yarn and you’re ready to join another square!
Part 3: Joining Subsequent Squares
As you join the rest of your squares, you’ll basically be repeating part 2 (see above), except the only difference being that sometimes there will be an area where you’ll be joining into a corner that has two or three squares (instead of simply joining into another square). In this case make you slip stitch join in the spaces between the squares (not the corner space). Always go directly across in your join to avoid it being off center. To see this join inaction in greater detail, be sure to check out the video. In the video, I join two sqaures together, then three, then four squares, showing all possible joining scenarios that may arise as you work on your blanket. The rule of thumb is that when you are no joining, you or a ch 1. When you at a spot that requires a join, simply replace the ch 1 with a slip stitch into the other square.
*Important: If you have never tried the JAYGO technique, I highly recommend the video.
Add a single crochet edge:
Using the same color as round 3, work 3 sc into each corner space. Work around the outside edge of the piece, working a sc into each stitch around and into each space as well. Join with a slip stitch at the beginning to close round.
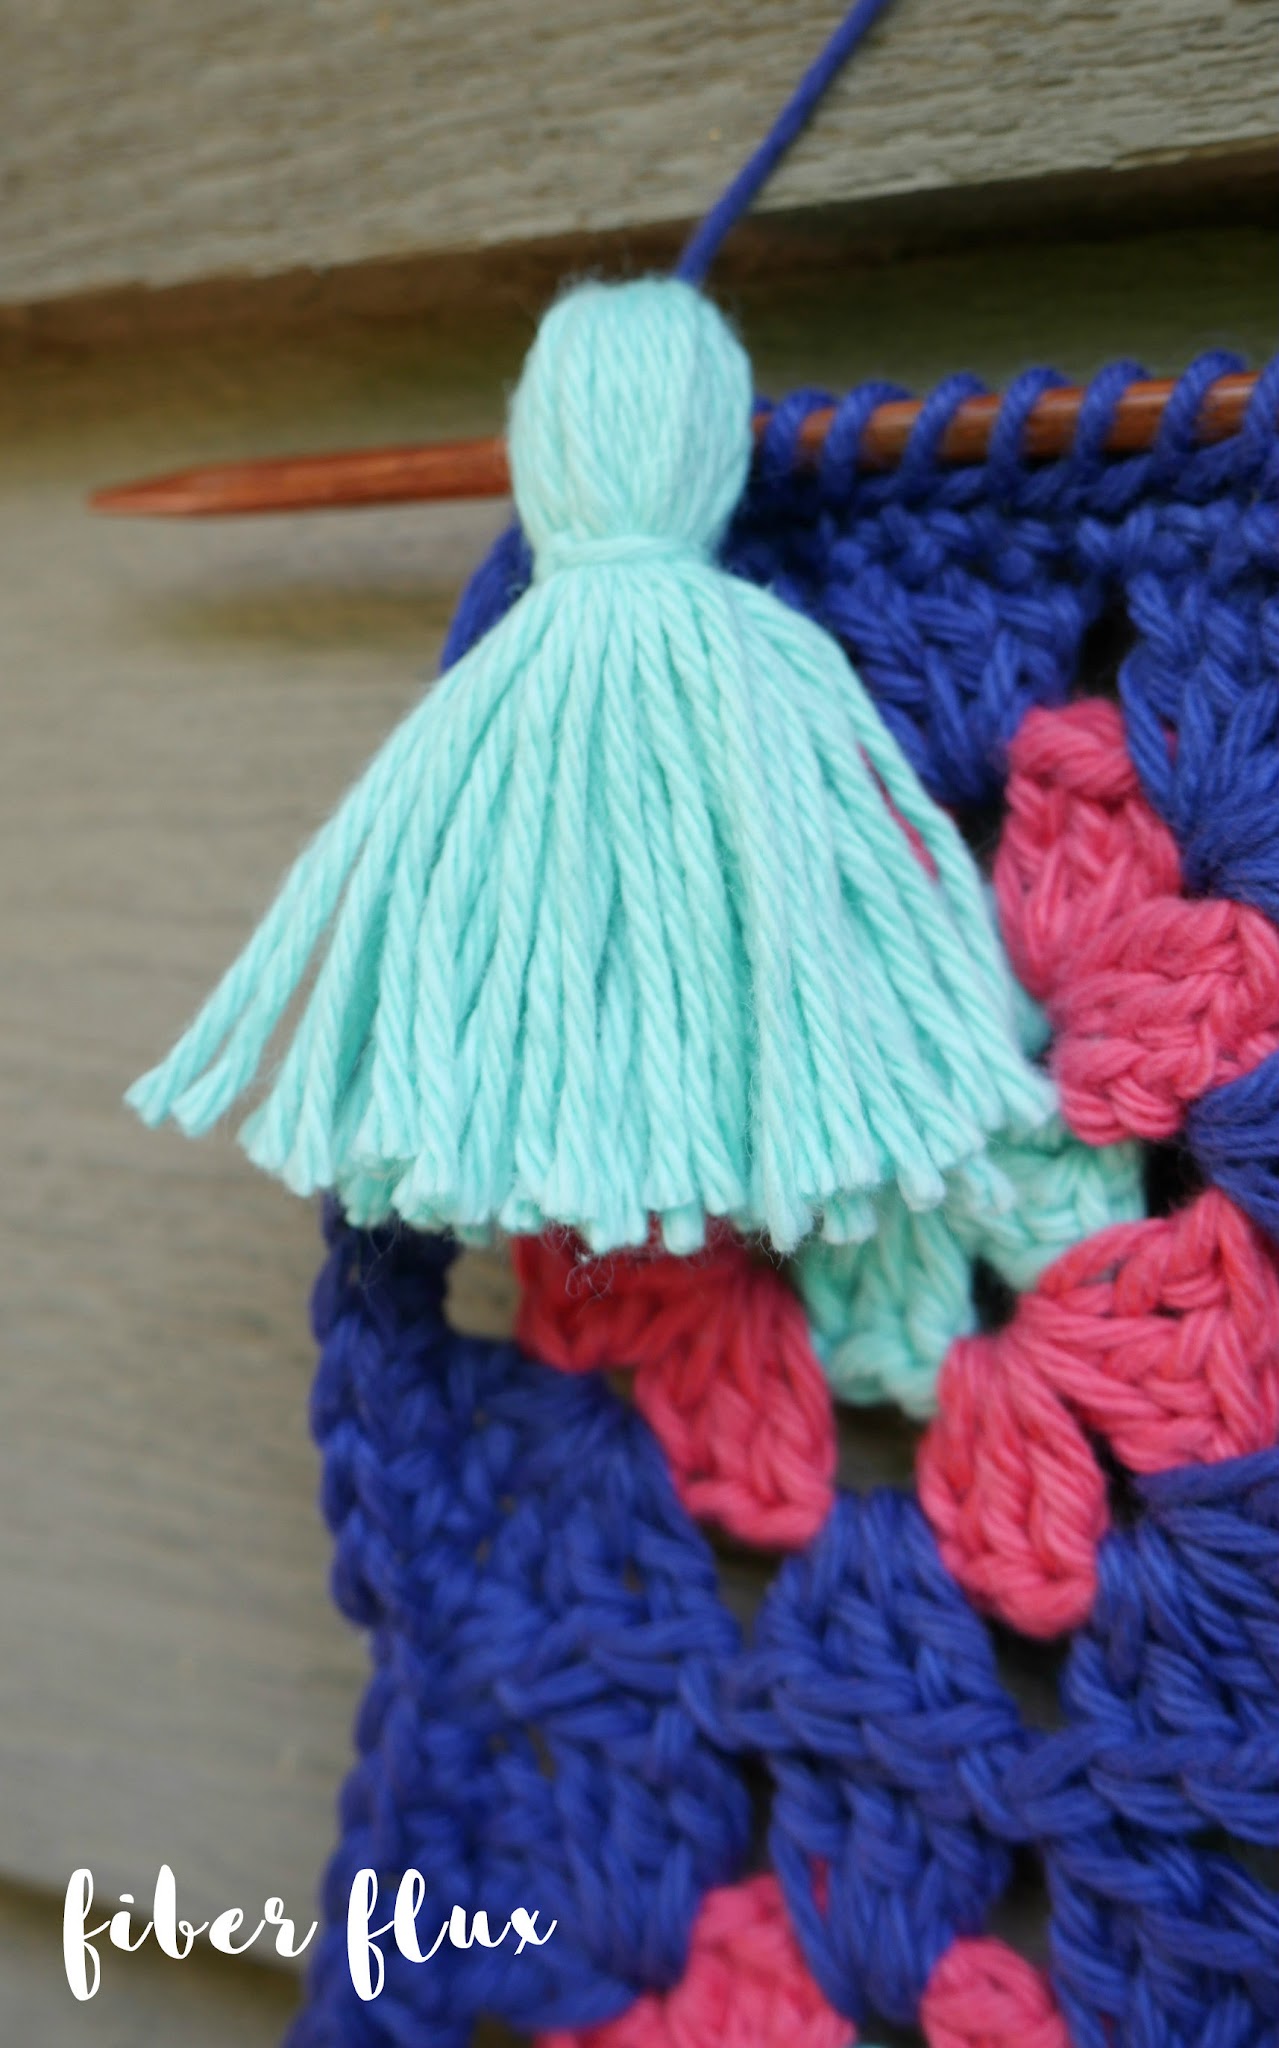
How To Make Tassels:
- Cut two strands of yarn roughly 12-16 inches long.
- Wrap yarn around all four fingers of your hand about 30 times.
- Tie one of the strands of yarn through the middle of the bundle.
- Using the other strand, tie it around the tassel about an inch or so from the top as shown above.
- Trim the bottom strands across for a uniform finish.
- Repeat for the other tassel.
- Check out the video to see this step by step!

How To Make Pom Poms:
- Cut one strand of yarn roughly 12-16 inches long.
- Wrap yarn around all four fingers of your hand about 60 times.
- Tie one of the strands of yarn around the middle of the bundle very tightly.
- Cut all of the loops.
- Trim strands for a uniform, fluffy look.
- Repeat if more pom poms are desired
- Check out the video to see this step by step!
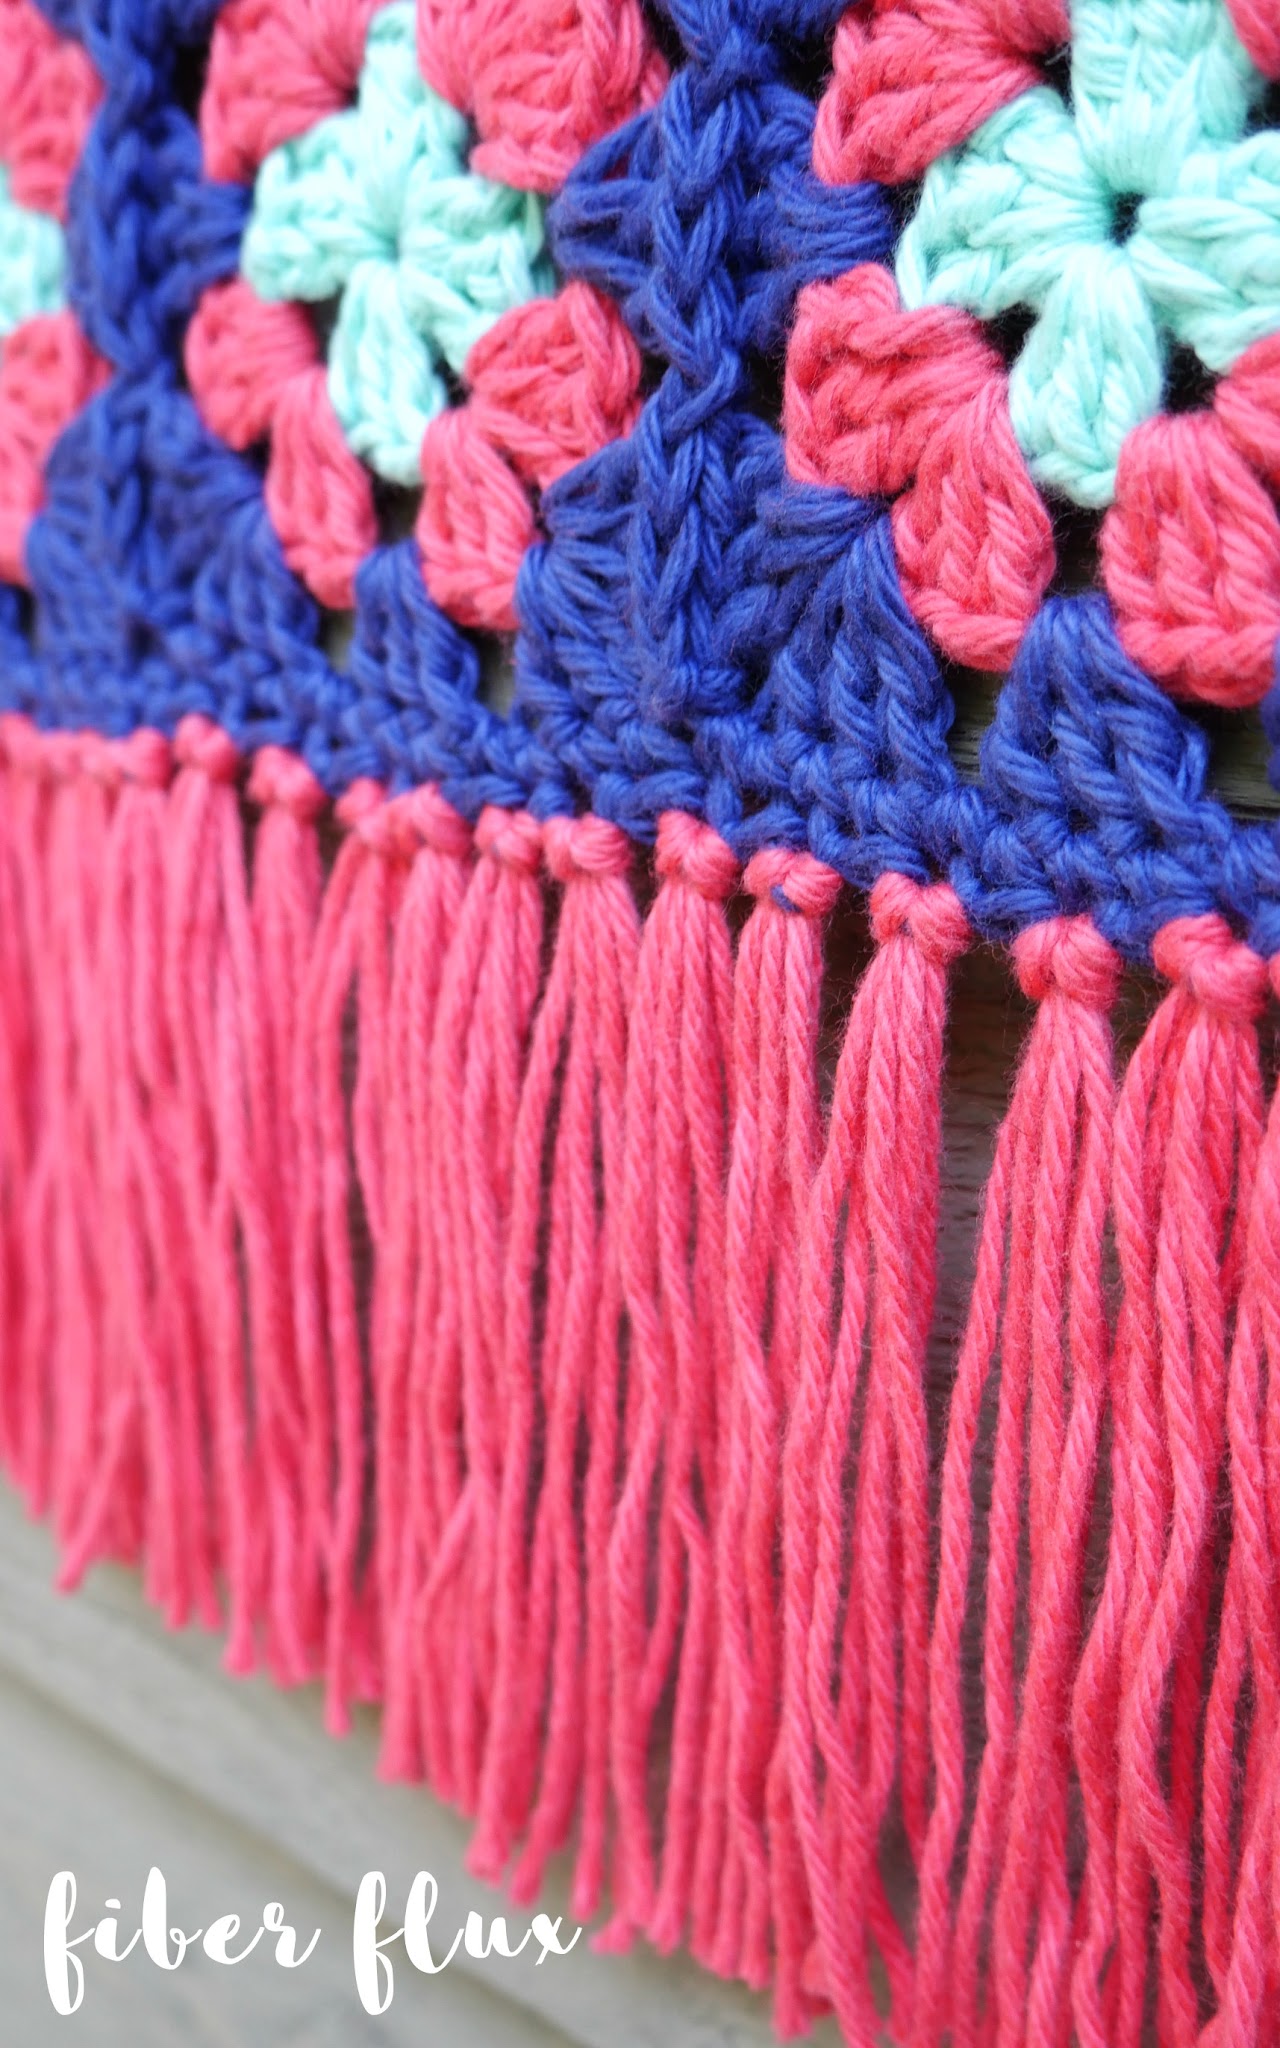
Adding Fringe:
- Using desired color of yarn, measure a length the width of the piece, then repeat and fold in half.
- Repeat once more and cut.
- Then fold that in half and run it through the bottom corner of one of the stitches of the granny piece.
- Repeat for the rest of the fringe all the way across. It helps me to add on at each end and work my way inward. This helps tremendously with spacing.
- When desired amount of fringe is added, trim in a straight line across to desired length. I walk through entire process in the video!
Putting it All Together:
- Using a tapestry needle and matching piece of yarn, whip stitch sew the piece to your stick.
- Tie tassels, pom poms, etc to desired locations.
- Weave in any ends. Fabulous!

© Jennifer Dickerson 2018
For more fun projects and pretty patterns, be sure to follow Fiber Flux on Google+, Facebook, Twitter, and Pinterest for the latest updates!

Visit the Fiber Flux Yarn Shop…lovely yarn & great prices!


 (Affiliate links, enjoy these awesome products and thanks as always for your support!)


can I use regular WW yarn for this project?
This comment has been removed by a blog administrator.