
![]()
Welcome back to Part 2 of the 2019 Fiber Flux Temperature Blanket CAL! If you’re not familiar with the concept, a temperature project is where you create a motif or row on a project you’re making based on your local temperature outside…fun! It goes on for a year and at the end of the year, you’ll have an interesting representation of the temperatures for an entire year!
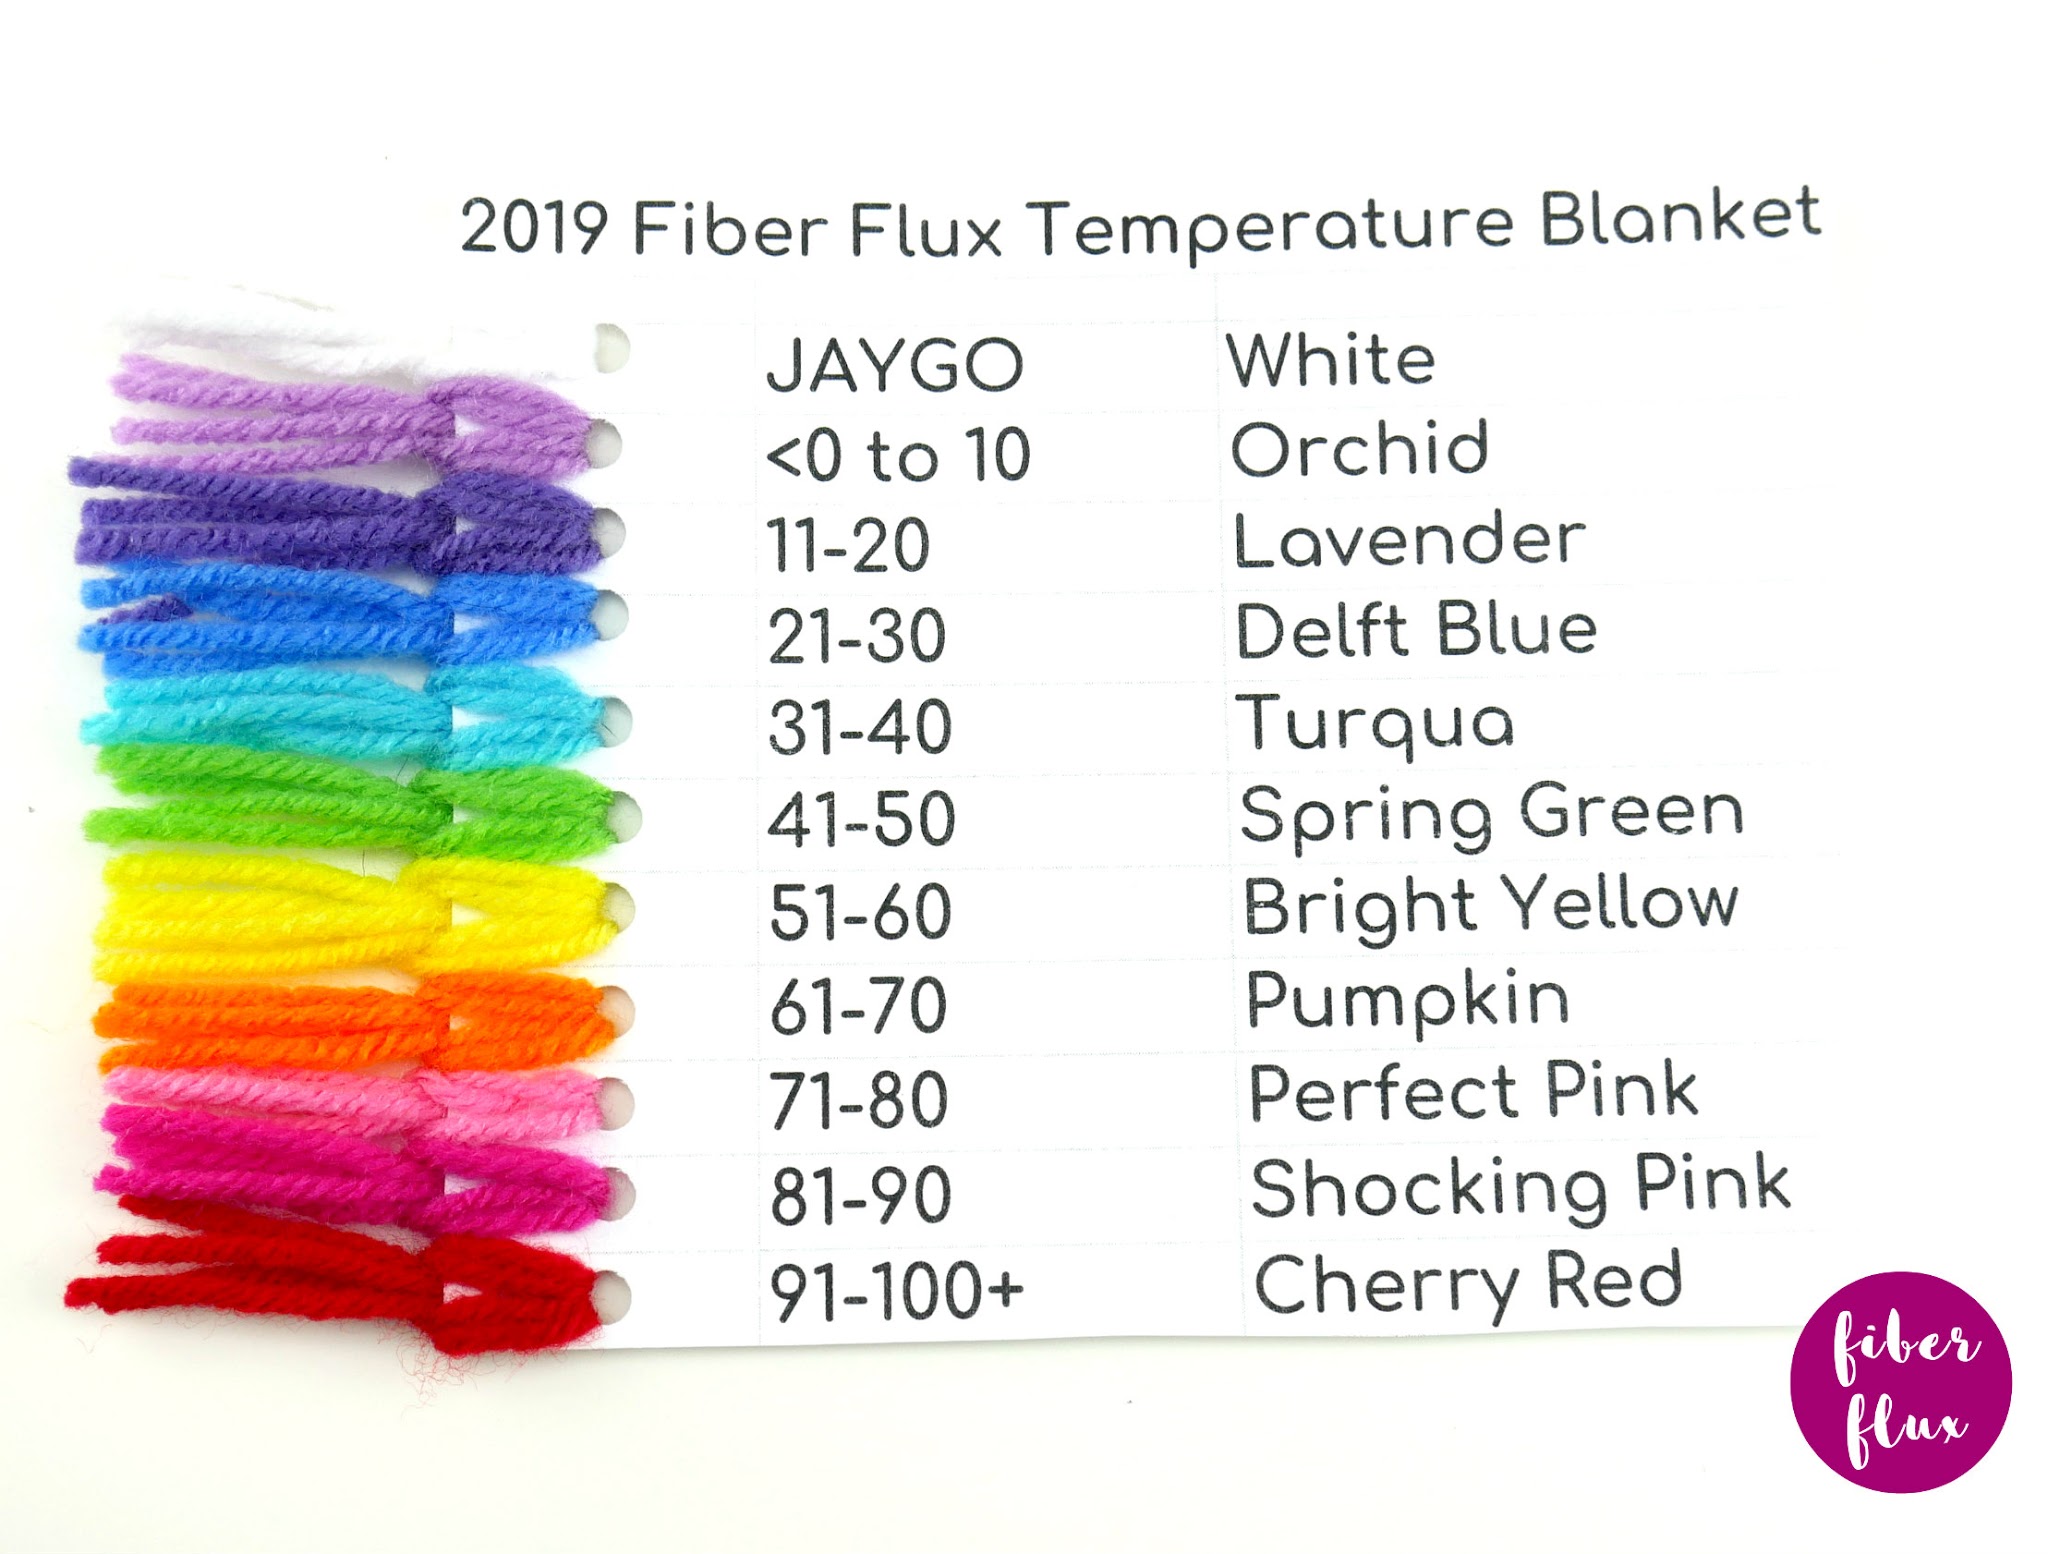
Here’s my chart…you can adapt this to your climate and create your own palette of colors as well!
Queue up on Ravelry!

Check out the video below that walks you through the squares and joining step by step!
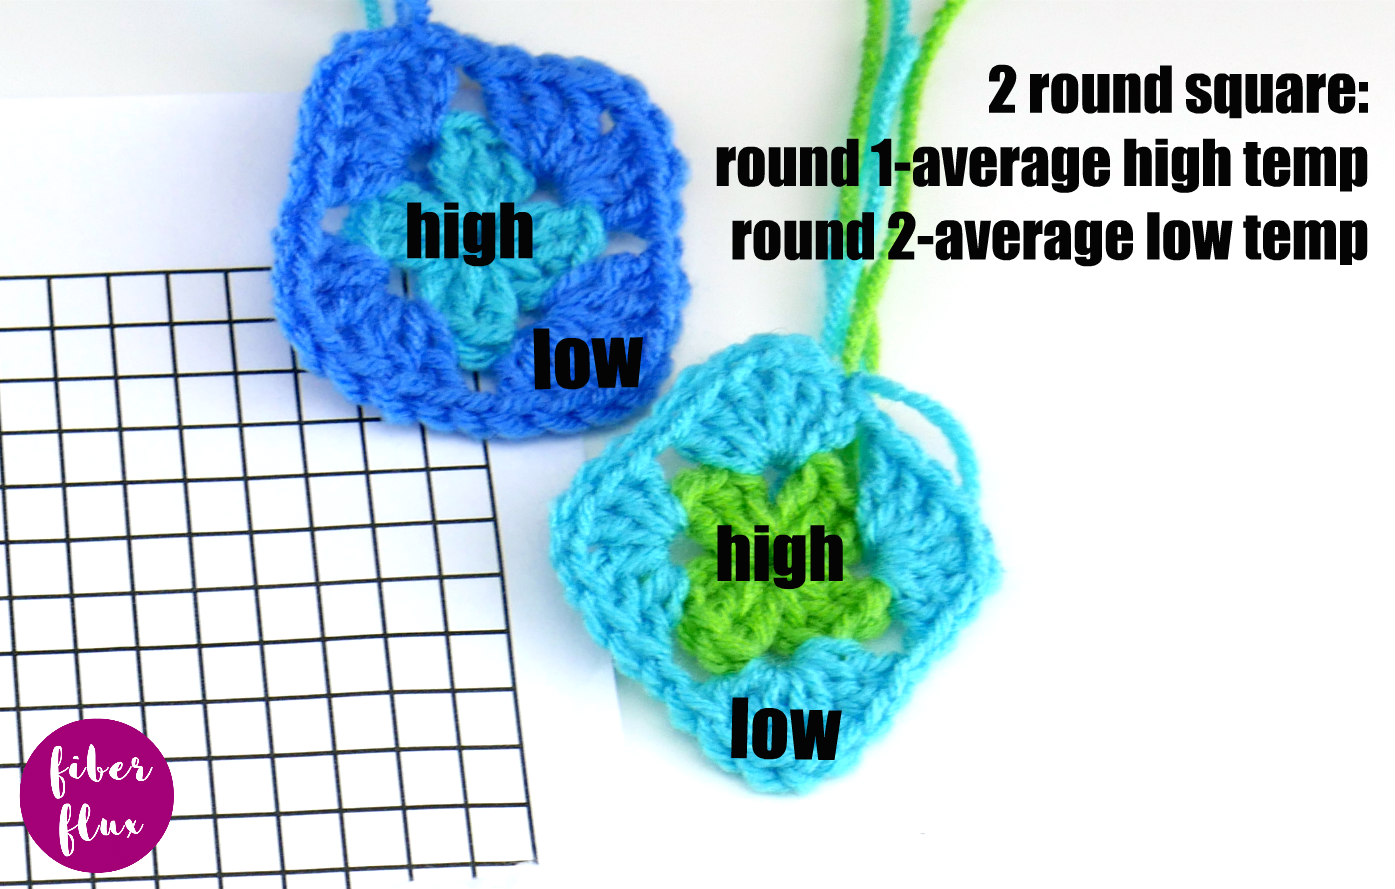
This year, I wanted to try doing a motif project…a gorgeous blanket! We’ll be doing a small daily square in just two rounds, they joining them together as we go with a common color (I’m using white) to frame them all in. Round 1 will be the daily high, round two will be the daily low temperature.
Get yarn for this project here!
(Affiliate link)
Ok let’s get started on those fabulous squares, shall we? We’re going to be covering a two color square, solid color square, and then learning how to join them as we go…no need to save that part till the end…your blanket will grow before your eyes!
Instructions for the square:
Working solid squares vs. multicolor squares:
- To begin a new round in the same color, simply slip stitch until you reach a ch1 at the corner and keep going.
- To begin a new round in a new/different color, cut yarn, leaving a tail, and fasten it with a slip stitch. Join the new yarn at one of the corners as shown and tie securely.
- Did your yarn run out in the middle of your round? Simply tie on the new yarn and keep going (weave in the ends into the corresponding color–blue tail into blue section of stitches for example).
Chain 4, join into a ring with a slip stitch.
Round 1: Chain 4, work (3 dc into center of ring, chain 1) 3 times, then 2 dc into center of ring. Join to close with a slip stitch.
Round 2: To work the corner of round 2, first chain 3, then 2 dc in same space, then chain 1, then 3 dc in the same space…first corner done! Then chain 1, then work the next corner by working 3 dc in next space, chain 1, then 3 dc in same space, chain 1, repeat two more times to complete the round. Join to close with a slip stitch.
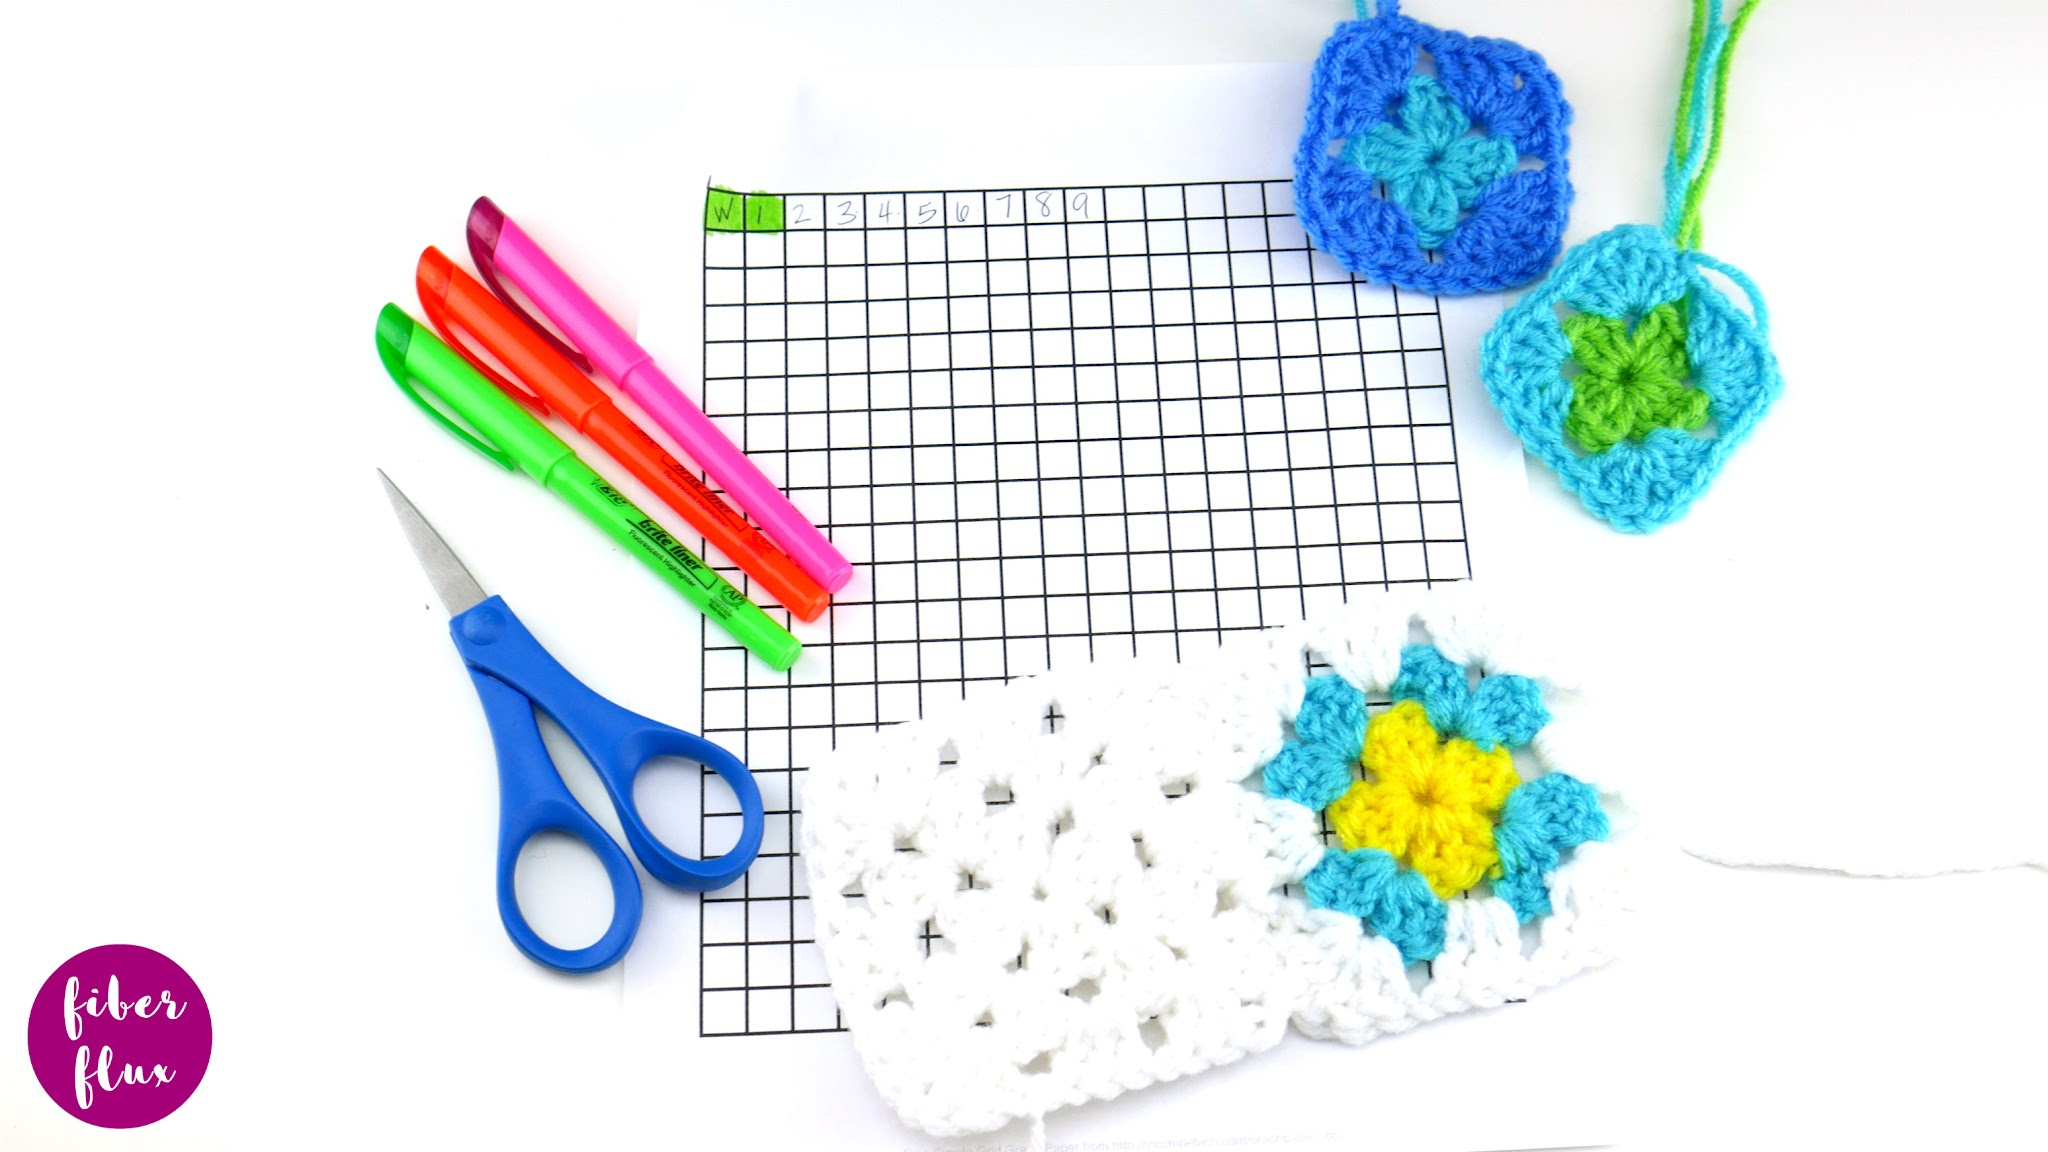
How To Join Squares Together (JAYGO/Join As You Go):
Note: It really helps to keep everything flat as you work, I like to lay mine on a table or lap as I go. Also be sure the right side (side that faced up as you stitched up your squares) is facing upward. I’ll be making the JAYGO part in the white yarn, but you can use any color you like!
Part 1: The Very First Square (worked independently, nothing is joined to this one yet)
Tie on the round 3 color (white) into any corner space of a square you’ve previously made and ch 3. In the same space, work (2 dc, ch 1, 3 dc). In each side space (there will be six of these if you are also working round 9 of the pattern. If you made a different number of rounds, your side space counts will be different) work (3 dc, ch 1). Repeat for each side space until you reach the next corner. In the corner space work (3 dc, ch 1, 3 dc). Continue around the square in this manner, working the side and corners the same way, then join with a slip stitch to close the round. Fasten off yarn.
Part 2: Joining The Second Square
Grab a second square and tie on the round 3 color into any corner space of a square you’ve previously made and ch 3. In the same space, work (2 dc, ch 1, 3 dc). In each side space work (3 dc, ch 1) You’ll have 6 side spaces if you made the same number of rounds as mine. Repeat for each side space until you reach the next corner…this is where we’ll make our first join. In the corner space work 3 dc. Instead of the ch 1, work a slip stitch into the other square’ corner space, then work 3 dc back into the square. As you continue down the side of the square, work a slip stitch into the other square instead of a ch 1, and 3 dc into the side spaces of the square. When you get to the next corner, work 3 dc, slip stitch into the other square’s corner space, then 3 dc into the corner to finish the joining. Work the rest of the square the way you normally would (3 dc, ch 1in each of the side spaces and 3 dc, ch 1, 3 dc in the corner). Join with a slip stitch to close round, fasten off yarn and you’re ready to join another square!
Part 3: Joining Subsequent Squares
As you join the rest of your squares, you’ll basically be repeating part 2 (see above), except the only difference being that sometimes there will be an area where you’ll be joining into a corner that has two or three squares (instead of simply joining into another square). In this case make you slip stitch join in the spaces between the squares (not the corner space). Always go directly across in your join to avoid it being off center. To see this join inaction in greater detail, be sure to check out the video. In the video, I join two sqaures together, then three, then four squares, showing all possible joining scenarios that may arise as you work on your blanket. The rule of thumb is that when you are no joining, you or a ch 1. When you at a spot that requires a join, simply replace the ch 1 with a slip stitch into the other square.
*Important: If you have never tried the JAYGO technique, I highly recommend the video.
Please visit and join the Fiber Flux CAL group on Ravelry to get updates, see everyone’s progress (fun because we all live in different places in the world with a variety of temperatures! Also, get questions answered, help others, and show off your work.

Click HERE to visit and join the group!
So, that’s all you need! Just keep adding those squares and I’ll see you at the beginning of spring for our first update!
Use the hashtag #fiberfluxcal to share your work or tag @fiberflux on social media!


© Jennifer Dickerson 2019
For more fun projects and pretty patterns, be sure to follow Fiber Flux on Facebook, Instagram, Twitter, and Pinterest for the latest updates!


This comment has been removed by a blog administrator.
Where can I find the video to join subsequent squares? This is my first granny square blanket. Thank you in advance.
The video in the blog post only shows joining 2 squares – where would I find the video showing how to join multiple squares? Thanks!